We had intended to do all the plywood ceilings in the house before the internal walls. However, over three ad a half months ago work on the ceilings stopped when we found that the remainder of our batch of BB hoop pine plywood had unacceptable blue stains. We took up this issue with the local supplier, Huskisson Ply. After countless phone calls to Husskison Ply that were not returned, we even tried phoning the distributor Gunnersons. We were happy to swap the ply sheets for those without blue marks and even pay for the extra transport costs. After three months (!!!) I finally got a reply from Huskisson Ply that we could return the sheets less a 20% restocking fee. So we would only get back 80% of the cost of the sheets.
We resorted through the remaining 26 sheets of ply and measured and calculated exactly how many sheets we needed and the size of each sheet. We worked out that any sheets less than the full width we could use the back of the sheet, as many with blue marks on the front did not have them on the back, and cut off the manufacturers big purple stamps that were on the back of the sheets. Other sheets with only patches of blue marks we managed to cut around the marks, resulting in a bit more wastage as some sheets we could only use about 1/3 of the sheet.
In the end we returned 13 sheets, but due to careful measuring we only needed to purchase 10 new sheets. This made up for the 20% we lost on returning the sheets. We returned the unused sheets to Huskisson Ply ourselves as we needed to get them out of the house as they were in the way where we needed to finish the ceiling in the main room.
The new sheets came from Mister Ply and Wood at Penrith. I had dealt with Chris Carter from Mr Ply several times over the previous few years and should have got all the ply from them in the first place. Instead I chose to go with an unknown local supplier to save on transport costs and support local businesses where I am building. Since I was only getting 10 sheets I was able to pick them up and transport them to site myself, by trailer, saving transport costs. I was also able to go into Mr Ply and Wood and due to my previous poor experience they let me go through the sheets they had in stock and select the ones I wanted.
 |
| Main room ceiling half done |
We are very happy with the result. The new sheets of ply have slightly less figure in the grain. In the bedrooms we love the interesting swirls in the ply, it was this unique feature of the wood that made us choose to do the ceiling in ply in the first place. However in the larger main room the less figure in the ply works better as it makes the ceiling less busy.
In the smaller rooms, such as the bathrooms, entry and hall we were originally going to have the black expressed joints between the sheets and put up the blocking and painted it black. However, when we realised that the smaller bathroom would only have one joint we realised that this would look a bit silly and decided to butt the sheets together with no express joint. In doing this I tried to match the machine cut joints together. I could not always do this, particularly where I was using the backs of the old sheets as I had to cut the manufacturers stamps off both ends. So I had to cut the ply very carefully and then sand the cut edge until it was perfectly straight, or as near as I could get it. Not doing the express joints meant that I did not have to paint the edges of the ply black, thus the ceilings in the smaller rooms went up quicker.
For the main room we also chose not to have a black border around where the wall meets the ceiling. This had worked well for the first two bedrooms we put the ceiling up in, but in the third bedroom one of the walls was not quite square and this upset the process of trying to get the black border around the room. This is something we will have to try to disguise with some creative rendering.
 |
| Butt jointed ceiling in the smaller bathroom |
The ceilings in the laundry and top of the hall were covered in one sheet. This was very neat but required careful measuring as the frame along one of the walls in the back section of the house was not straight.
 |
| Ceilings covered in a single sheet |
With half of the main room ceiling left to finish, illness in the family, looked like delaying the completion of the ceiling. With very good timing my mate Tony offered to come down and help out on the build for the weekend. Over two days the rest of the ceiling went up like a dream thanks to the panel lifter, the 9mm strips of timber used to measure the gaps, careful measuring and Tony's help. It was truly a joy to look up at the completed ceiling in the main room, reminiscent of Japanese Tatami mats on the ceiling.
 |
| Completed plywood ceiling |
The internal wall sheeting had previously stopped short of the ceilings so that I could put the ceilings in first. With the ceilings done work continued on the internal walls. I had under estimate the number of screws required to put up the internal walls. The house does not have many internal walls, but some of the internal walls are quite high and the raked ceiling meant that none of them could be completed floor to ceiling in one sheet. The built in robes also required more sheeting that it first appeared. I initially bought from Nepean Boltmaster 1,000 x 30mm and 200 x 20mm fibre cement screws. The shorter screws were for the sheets attached to the cavity sliding door units as the screws could not go through to the other side of the timber side rails of these units. I then bought 300 more of the 30mm screws. Then another 100 x 20mm and 200 x 30mm and a further 200 x 30mm to finish off the job. That adds up to 2,000 screws.
 |
| Almost 2,000 screws used |
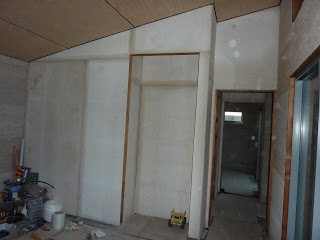 |
| Internal in walls in bedroom and robe sheeted with MgO Board |
 |
| Bedroom and robe MgO sheeting completed, in late afternoon sun |
Before ordering the MgO Board I had done a rough drawing of all the pieces I would need and roughly worked out what pieces I could get out of each sheet. When I cut each sheet of MgO I cut the large pieces out first and worked out the most efficient use of the remaining piece. This way I used the MgO board much more efficiently than I had first calculated. I will have 8 sheets left over after I use one more for the bath hob. The left over MgO Board will be used for the ceiling of the shed I will build later.


