Tuesday, 15 January 2013

Hemping difficult locations

We had not hemped above some of the wider windows with large lintels as I was not sure how to provide extra support to the hemp above the windows as I was  not leaving a permanent form work. I eventually chose to use a wedge of wood sloping down toward the lintel to hold the hemp up and onto the wall where the lintel prevented the hemp keying in from one side of the frame to the other. This is an adaptation of the method used by Rodney Gregg on the Tasmanian hemp house, the walls he built were much thicker and so the timber pieces could be larger. Here I tried to get the timber as thin as possible using 35mm cut with a 45 degree angle and a small flat section at the bottom to attach it to the lintel. I found that the 45 degree angle made thee timber too tall and later used a 30 degree angle and found this just as effective. Extra care had to be taken to use a very thin tamper to put hemp in the 20mm gap between the timber and the form work, given that my walls are only spaced 55mm out from my frame on either side. So as not to cause a weak spot by this thin section of hemp I attached the timber pieces in several discontinuous sections above the window. 

First draft 45 degree timber section
Attached to the lintel on top of the temporary form work
We have been building the walls over weekend and so usually have a week or two gap between each time we see the walls however, over the Christmas/New Year break we spent 9 days building and got a chance to watch the walls dry out. For the first few days after the walls were cast they maintained the darker wet look, then quite suddenly took on a lighter dry look. For the pictured section of wall we also had to add in a hole in the wall for the wall mounted exhaust fan (the ceiling joists of this section were not deep enough for a ceiling mounted exhaust fan). The hole form work was made using some circles cut from OSB with ducting taped between and stuffed solid with scarp plastic packaging from the build. A little hole was cut in the ducting to take the electrical cabling for the exhaust fan. Hopefully we can leave the ducting in situ and use it for the fan.


Work done on 26 and 27 December
Dry by 3 January and hole for exhaust fan ducting
Not long before Christmas, Len, our plumber organised the Council inspection for the plumbing. The plumbing passed, no problems, but the council inspector picked up a problem with the frame. The ridge beam for the hallway was attached to just the studs and top of the door frame at either end. The inspector thought that over time the weight from the ridge beam may cause the top of the doors to sag. The answer was extra timber reinforcement. On each end of the hall I added what in effect became a timber lintel. I cut this into half the studs and made sure that it rested on a full length stud, which the door header did not. This was a difficult job in the standing frame, made more difficult on the second side I did by the need to avoid plumbing pipes and electrical cables. But my added lintels were securely held in to the board to which the ridge was attached and to the studs with, my favourite, batten screws.

Extra timber support added
As the walls have got higher we are having to lift the form work up higher, a job for which scaffolding has become a necessity.

Hemped above the kitchen window
Form work gets higher
When I drew the plans I always knew that the parapet wall above hall would be difficult to build and this proved correct. The location of the rafters meant that thee very top of the wall could only be done from the outside, which in this case was on top of the hall roof in a very small space.

Parapet wall form work in a small space
Form work right up to the rafters
Small risers were used to get closer and closer to the ceiling, then I had to work from the outside. I had to shimmy in under the the guttering and try to bend my arm at the right angle to shove and squash hemp into the last little bit of the wall.

Tight squeeze, bucket of hemp barely fitted
The most awkward possible position from which to build hemp walls

Despite the difficulty with the access for putting up the form work and the filling with hemp, the walls were well tamped and looked great. Just the spacer holes left to crawl back under to fill.


Hemped parapet wall
Inside the hallway
Other side of the photos above, showing no hint of the abutting wall
The protruding awning rafters  meant that form work had to be cut around each of rafters. This was done by measuring out the spacing and marking it on a lighter piece of timber, to avoid lifting up the heavier form work, cutting out the depth of the rafters and placing the form work up to the top of the rafters. Hemp was then placed in the form work and once the top of the rafters was reached an additional piece of form work ws added without removing the lower form work, this was so that no gap was left as the upper form work sat on top of the rafters.  

Form work cut around the awning rafters
The result on the inside was beautiful
With the skillion roofs we have lots of sloping walls to finish off to the roof line. As each rise reached the ceiling we have finished that section to the ceiling and continued along the rise. Like the other walls we have finished to the ceiling we mover the external form work up to the full height of the wall then finished the wall from the inside in two rises; the first with the internal form work up to just under the bottom of the top plate and hemp filled up and packed under the top plate and second with the form work up the the ceiling line allowing the hemp to be placed in beside and over the top of the top plate.

Formed up to the ceiling in the centre and just off the ceiling on the right
Wall fully formed up to the underside of the eaves on the outside


Monday, 14 January 2013

Awnings and Bastard Valleys


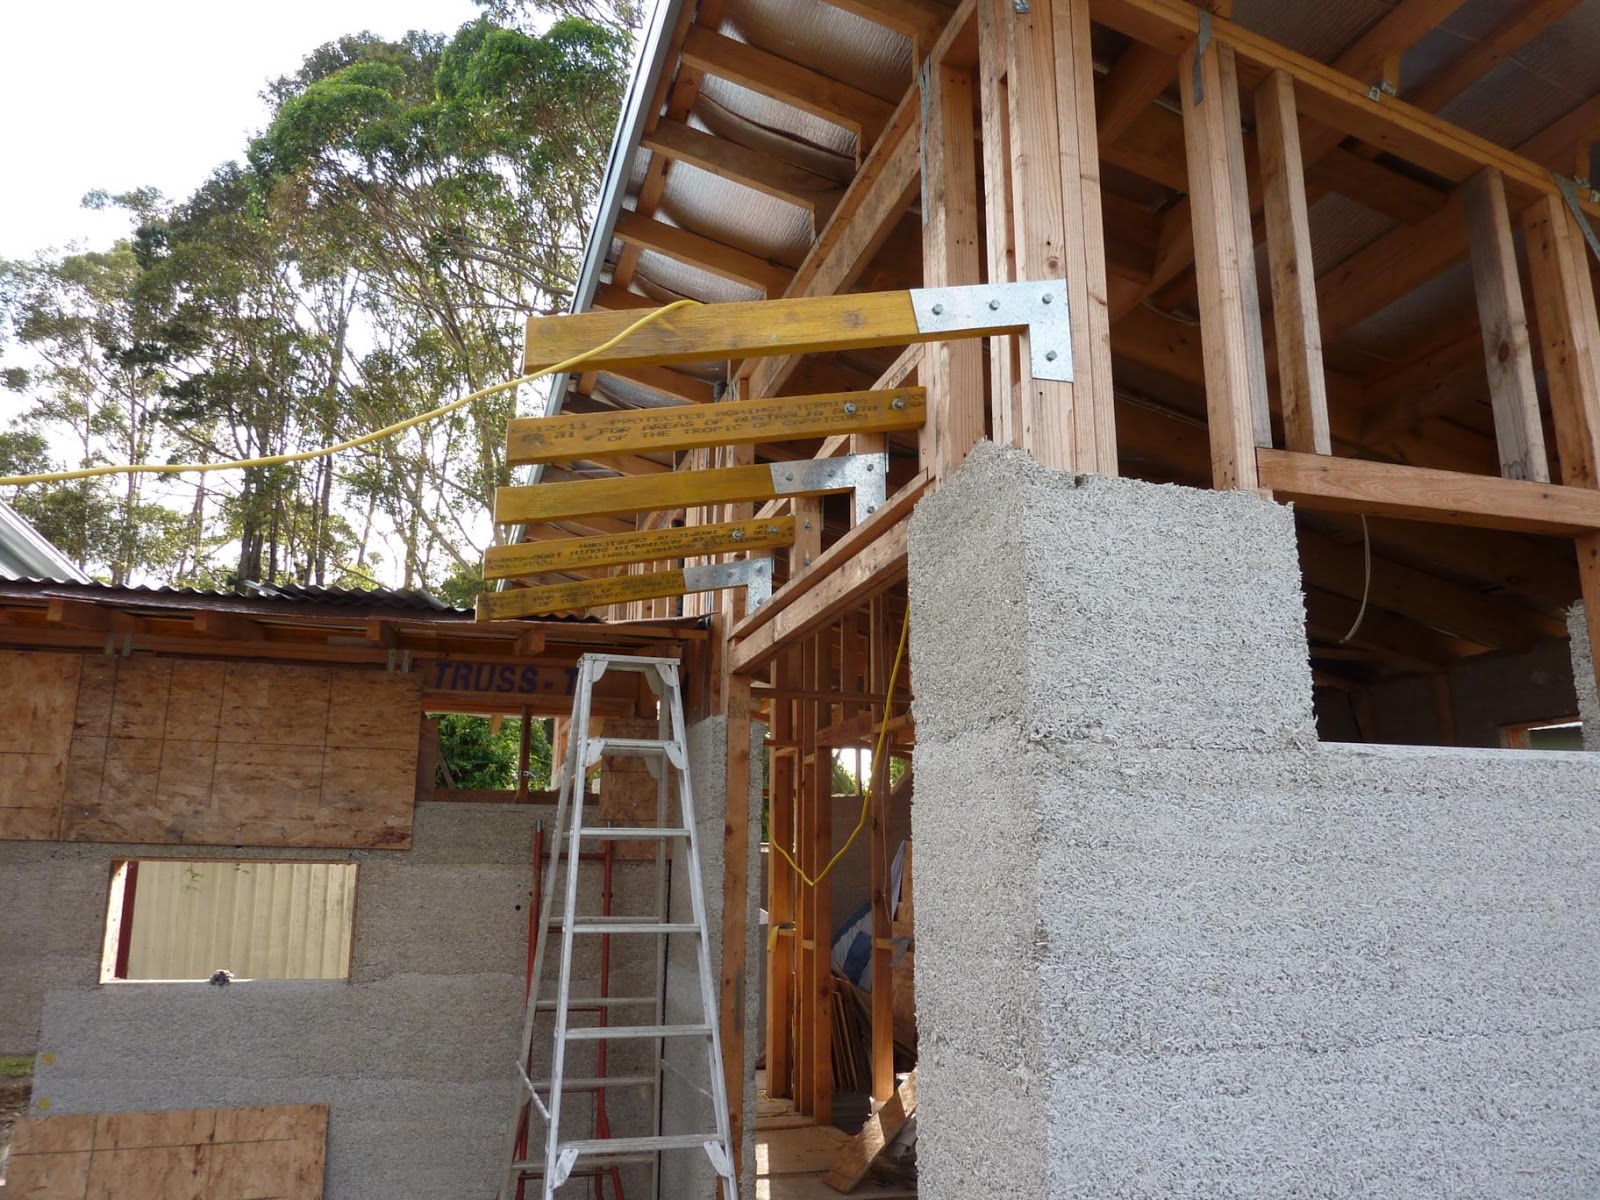
By Christmas we had almost done as much of the walls as we could without putting the awnings on. Originally the delay was getting the awning brackets on, but this was easily solved after getting  a few quotes from steel fabricators. The brackets were plasma cut to the engineers design from 3mm Galvabond steel by WH Williams at Silverwater.  For added protection from rust I sprayed the cut edges with Cold Gal. I then sought a builder to do the carpentry work but could not find anyone willing and available to do the work. I sought advice from a carpenter friend and with the promise of assistance, resolved to put the awnings up over the Christmas break. Due to other commitments the assistance went from in person to telephone help. I was on my own, so I consulted Alan Staines book, “The Australian House Building Manual". It showed some clear line drawings of what a valley should look like.

Friends from my son’s pre school stayed on site with us for a few days after Christmas for a working holiday and Will go roped into assisting me with the awnings. The purpose of the awnings is to provide shade to the north side of the house in the warmer months, as well as to provide a sheltered area under which to enter the house through the glass sliding doors and to break up the large north facing walls and visually anchor the house to the ground. The awnings too some thought but were not beyond our capacity.

We started with the awning on the back pavilion. Although Will did not have a building or carpentry background he took a thoughtful and practical approach to things and was helpful to bounce ideas off. The attachment of the brackets was straight forward, once I worked out the correct position from the ridge on the hall, taking into account the depth of the batten to go on top of the awning rafters and the width of the hemp wall, so that the roofing on the awning will line up with the roof of the hall at the ridge and eaves.  This meant I had to build a bastard valley where the two roofs joined. The awning rafters were bolted onto the brackets and the brackets bolted to the studs at 600mm centres. Because some of the studs were only held between the sliding doors and upper windows, we reinforced these studs where they met the window sill with a metal plate (cut from spare brackets because we reduced the length of the awnings), to prevent the stud from pulling out from the sill, given the extra weight on it from the awning. 

Awning rafters attached
A job well done
 Bastard Valley really is the technical term for the valley between two roofs with different pitches and it lived up to its name.  We worked out the line for the valley rafter then, to complicate matters, had to remove part of the hall roof, that had temporarily been put on to give us a dry space to work under, and remove some of the hall battens and shorten some rafters, while still maintaining the rafters to attach the ceiling lining to. To do this we left in one of the hall rafters, which would otherwise have crossed the valley rafter, and ran the valley rafter from there, which involved cutting the valley rafter at a compound angle (angles in two different directions). After some head scratching as to what the angles were and then how to get the saw to produce them, we cut the angle correctly and the rest of the awning rafters were cut to fit. The following day a little bit of adjustment (by loosening the bolts, moving into place, and re tightening) was needed to one or two of the rafters to get them to line up at the right height with the timber fascia, which was also used as the final batten. The rest of the battens will ho on after we have hemped the wall above, by temporarily leaving them out we can duck through the rafters to put up the form work. We will place the hemp mix from the inside. 


Newly installed bastard valleys
Valley rafter joins timber fascia
 A few days later my partner and I tackled the other side of the awning. It was definitely easier but there was also more swearing as little things went wrong. We had some luck, the metal strap bracing looked like it would get in the way of the brackets, but amazingly the correct spot for the bracket fell between the cross pieces of the bracing. We used leftover triple grips where the awning rafter intersected with the hallway top plate. The first awning we nailed the valley rafter to the awning rafters, but for the second part of the awning used batten screws. Batten screws are so strong and with the impact driver easy to put in. They are me new best friend.

Lucky bracket location between the bracing
Second side of the back awning done
We are now 1/3 of the way through the awnings. Just the sections on the main and front pavilions to go.
More awning rafters ready to go up on the main pavilion

Sunday, 23 December 2012

Cracks in the Concrete


Despite using 32MPa concrete, we have cracks. So far it looks like there are cracks in the larger sections of concrete approximately every metre. We can only see the edge of the slab and where there are door openings because we have covered the floor with plastic and boards to protect it while we build, our walls also cover most of the top edge of the slab. So far we cannot tell how far across the slab the cracks go, but the cracks go right through the outer edge of the slab. We were warned from several sources that it is in the nature of concrete that “it cracks”, but I hope that the cracks are not too obvious in the final finish of our polished slab.

Crack down the outer edge of the slab
Crack on the top of the slab
We have joined the owner builder sharing merry go round. On the take side, Tony and his owner builder mates have kindly lent us a couple of pieces of scaffolding. Now that we are building walls over 2.7m high the scaffolding is immensely helpful. With no noggins in the way, working on the scaffolding was almost as easy as working on the ground again, with the exception of having to climb up and lift buckets of hemp onto the scaffolding. On the give side, we have passed some excess OSB boards on to owner builder Nicole for her to use as form work for her hemp building project.

Bathroom window openings finished
The very useful scaffolding
 We now have the tricky task of working at head height under the roof, finishing off the top layers of the walls. This is difficult, particularly in the bathroom where the rafters are only 150mm deep. It will make us appreciate the 250mm rafters when we get back to working under them. However, once we realised that we could do the work by feel and did not need to look down into the form work it became easier.  The joy, after doing this work, was taking the form work down for the last time.
Finished to ceiling height under 150mm rafters

Hemping around the parapet wall where the lower front pavilion roof meets the vertical wall of the main pavilion was tricky, mostly because there was a a section that will be in the ceiling space of the front pavilion, but is the back of the wall of the main pavilion that we could not get any form work into and ended up stuffing the space with a piece of Formex left over from the concrete joint.

Parapet wall with black Formex filling gaps between the pieces of form work
Thoughts and organisation have moved on to the next stage of the process and I have ordered my plywood ceiling lining from local company Huskisson Ply – their price was good and delivery is only $20. After researching the performance, properties and price of various ceiling insulation I have chosen to pay a little extra and go with sheep’s wool insulation. My final choice was between the sheep’s wool and recycled polyester. Finding out how sheep’s wool insulation could deal with changes in moisture and that it was a natural product were the determining factors in deciding to go with the sheep’s wool. 

I found a good price through an on-line building supplier, but the insulation was coming down from Queensland and the cost of freight was almost as much as the cost of the insulation. So, I contacted the manufacturer, Higgins Insulation, whose website indicated that they sold the same insulation at an only slightly higher price than the on-line seller and the insulation could be picked up from their Sydney warehouse. It turns out that the Sydney warehouse did not have enough in the R-value and size I needed, so with the offer to get 3.5 for the same price as 3.0 I now have a mix of each and in 580mm wide and 430mm (which cut in half will make 580).

I will use the 3.0 in the main pavilion as it has higher ceilings and the best ventilation, to make use of cooling breezes in summer, and the most amount of north facing glass, so I hope it will warm up well in winter. The rest of the house will have 3.5 except the hallway which has 90mm rafters. I am yet to work out the best form of insulation for the hallway but suspect it may have to be some sort of expanded polystyrene, in order to get the same R-value in a thinner material. 

I will be using Magnesium Oxide (MgO) board on my internal cavity walls and then rendering this with the same 10mm of lime based render as the inside of the external walls, to give the walls a consistent finish. The MgO Board will be coming down from Quantum X in Queensland as a distributor in Sydney from another company could only supply 10mm or 12mm boards. MgO Board is not manufactured in Australia, but in my view is a greener option than fibre cement or plasterboard and I will render it with the same lime based render I am using on the external walls so you will not be able to tell the difference between the external walls and the cavity walls.

Thursday, 29 November 2012

Parapet walls and tricky formwork

Last weekend we finished another wall up to ceiling height - the back wall of the main pavilion. This wall abuts the roof over the hallway and I knew it would be a difficult section. The over flashing for the hallway roof is already installed and finishes about 55mm- 60mm from the frame, the same distance that my form work needs to be from the frame. This meant that I had could not fit the form work sheet at the required 55 mm distance out from the frame. I trimmed one of the battens from the hall roof by awkwardly sawing upside down, then fitted the timber form work as close as possible and filled the gap with a bit of left over Jointex (stiff joint) from my concrete slab. The lightness of the hemp meant that the Jointex that was just wedged in place was not pushed out when the hemp was tamped.
Form work around parapet wall
Jointex filling the gap in the form work
Form work well fitted on top of over flashing
Some heavy rain and no downpipes meant that the rain and mud, under where the down pipe will be, splashed up on the hemp wall. The water did not soften or damage the hemp wall at all and it remained as hard and solid as the other walls.

Rain and mud splashed on the external wall
Completing the back wall meant working up to ceiling height. With our experience from the first wall we did this on, we did the last part of the wall in three stages. Firstly filling up to where our arms could just get into the form work, then raising the form work up to the full final height on the outside and just below the bottom of the top plat on the inside. We then filled under the top plate and up to the top of the top plate on the outside of the wall. Finally we moved the inside form work up to ceiling height and filled the remainder of the wall, going over the top of the top plate as the cut away in the eaves rafters has meant that the outside of the wall finishes above the top plate.

Filing under the top plate

As well as finishing the back wall of the main pavilion we did more work on the small sections at the front of the house and around the front door, which is yet to have the roof above it finished.

Completed back wall from the outside
Completed back wall from the inside
Front of the house taking shape
Front door

Wednesday, 14 November 2012

Final hemp walls started

Hemp walls now done on front of house
While the rest of the house was done up to door height, four small sections near the front door and large glass sliding doors had not even been started. Over the weekend we did two rises on each of these small sections, so now all the walls have been started. It was odd going back to the beginning and putting down the damp proof course and tamping into the set down in the concrete, but seemed much easier now then when we first started. The small sections were left to last as we tended to prioritise the long runs, but with lots of studs and noggins, and corners on three of the four sections, the sections may have been short but were very fiddly to tamp. Our friends, Ann and Will, helped the fiddly sections go up faster, while their children Daniel and Alexander kept our son well entertained.

The last sections to be started
 We also had to remove a section of concrete, now in the set down for the glass sliding doors, due to an error in the frame construction. It was nerve racking cutting into our beautiful concrete slab, trying not to damage our polished concrete floor, but with a new masonry cutting wheel on the angle grinder the cutting went smoothly. My fear of cutting into the steel reinforcing in the slab, came to be with a small section of steel being exposed. The circular wheel on the angle grinder could not cut a square corner so the last section was removed by hand with a hammer and chisel.

We had been concerned about the hemp sticking to the tall thin section between two glass sliding doors, as the section was just solid studs with no section where the hemp could meet up with that on the other side. We attached two of the bent up left over fascia brackets to each side of the column in the first rise and, on the side where there was no conduit, also in the second rise. Hopefully this will keep the hemp attached to the frame.

Tall thin section

Forming up began to get difficult as we reached the section where the wall with the hot water service intersects with the hallway roof. With some very tricky cutting we managed to put the form work up to half way through the roof intersection.

Back wall of the main pavilion


Sunday, 4 November 2012

Hemp walls up to door height

After another successful weekend of work almost all of our walls are up to door frame height (2.1m). On Friday with the help of some friends we set a new record of 17 mixes in half a day. Novice builders Sara and Alli picked up the methods of hemp wall building very quickly. Plus on Friday we had the added help of now experienced hemp builder Nicole, who is soon to start making the walls for her own hemp house, together with her builder Noel. Nicole will be able to learn from our successes and mistakes and will no doubt learn some new things from her own build, as every build is different, depending on the design, location and materials used.

Looking from the back toward the main and front pavilions
An all female effort on the new rise near the hot water system
Bathroom windows take shape
Bathroom and side wall
View of front pavilion from the north west

The lower of the two fresh rises was proudly another all girl effort
Largest section of wall uninterrupted by openings
Walls go up around kitchen window
View of hall and kitchen
As the walls have got higher we have had to move from working on a plank on crates, to a plant on trestles and hopefully soon we will be borrowing some scaffolding. As we start to work higher toward the roof moving the form work is becoming more difficult, two people working either side of an 8 foot ladder is the current solution, but very soon even that will not be high enough.

23 mixes on Saturday has brought out total to date to 290 mixes. Fine weather, warm water and a swim rewarded our hard workers on Sunday.

Sunday, 28 October 2012

Removing and rebuilding hemp walls

During our absence from the building site for almost three weeks there was a severe storm and a large branch from a neighbour's gum tree fell onto the fence and into our yard. The fence was dented, but thankfully it missed the house - one of the reasons we deliberately did not locate the house under the gum trees. The storm also moved the hardwood pallets off the plastic they were holding down covering the pallets of binder. The pallet fell into the hemp wall but hardly damaged the wall, leaving only a 3mm deep line where it hit the wall.

Fallen tree branch and dented fence
The walls of the drier mixes we had done had been left to dry for three weeks, but were very soft and crumbly. Further inspection showed that the dryer mix had not solved the problems of the hemp wall pulling away from the timber frame around the doorways or the cracking. The dryer mix had both vertical and small horizontal cracks, however there was no cracking between rises, showing that wetting down a bit more between rises made a difference. The problem with the dryer mix was that it appeared that it had not bound together properly, when you ran a hand across it, in parts, the wall just crumbled away. The top of the window sill was also loose and crumbled when touched. This was in contrast to the wetter mix that had only been done the week before which was solid and did not crumble at all. Some parts of the dryer mix wall were more solid than others, but the mix where we had used 10 litres rather than 9 litres of water was more solid and much less crumbly than the 9 litre mix, although it was still weather than the wetter mixes we had done.

Video providing a comparison of the walls.

Horizontal crack mid rise in dryer mix
Vertical crack in dryer mix
Vertical crack in wetter mix
Marks showing where the wall has crumbled when rubbed
Worried that the render would not be sufficient to hold together the crumbly walls with out cracking we decided to demolish the walls we did with the dryer mix and redo them with a wetter mix. The ease with which the walls were able to be removed confirmed that we made the right decision to demolish them. It was also very obvious when we got the the walls that had been made with the wetter mix, they were hard and we could not easily remove them by hand.

Wall removal
Wall material taken out
 It had taken one day, 17 mixes, to do the dryer walls. It took half a day to remove the section and another day to rebuild them, and with the extra half a day we had we did the next rise in the main bathroom. This time we used an in between mix of one and a third buckets of water. Not as wet as our previous mix of one and a half buckets, but wetter that the too dry one bucket mix. This time we also made sure that we sufficiently wet down the joint between the rises. We used a child's watering can.

Kitchen wall redone
Wall solid even when form work just removed
New walls done too
 I followed Rodney Gregg's recommendation and got some washers used to attach Styrofoam and used these to put screws in to pull the wall back in where it had pulled away at the door edges. A large chain hardware store did not carry the washers, so I looked on the Internet for Styrofoam walling suppliers. Just when I thought I would have to drive a long way or get the  mail order. I found on the Internet that Culburra Beach Hardware was a distributor for Ezywall Styrofoam products, one of the accessories for which are the plastic washers I needed. So I purchased a box of 500 and have using them to pull the walls back to the studs where they have come away. It has worked a treat.

Ezy washer and screw
Hemp wall pulled in to stud
Wall pulled back in